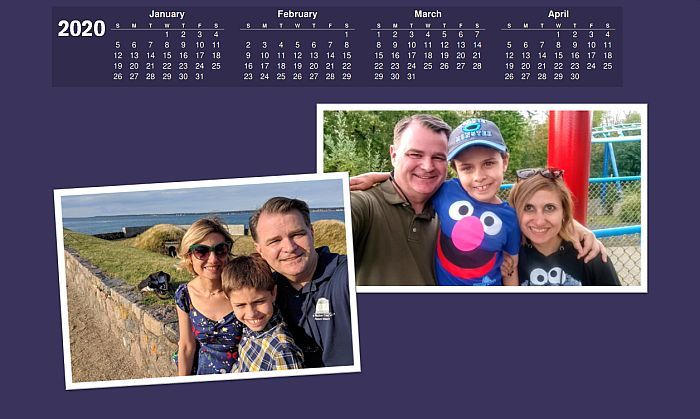
My annual custom is to change my computer desktop wallpaper along with the flip of the calendar to the new year. In the snapshot below, you can see my desktop update just completed. The desktop wallpaper in this case is a composition of a couple of recent photos along with a mini calendar. I find it very convenient to include a calendar on the desktop for looking up dates.
First, let me give you a written how-to of the steps so that you can make something similar to this for your own desktop. At the end of this post is a how-to demonstration video in case you learn better by watching instead of reading.
In my recent blog signature post, I had mentioned how those that have the latest versions of Microsoft Office Suite primarily use Word and Excel. Included in the suite are other programs people are often not as aware of. In the Windows version of the suite, there is an app called Microsoft Publisher. The mac version of the suite doesn’t get Publisher (for some reason), but it does have PowerPoint. Both Publisher and PowerPoint make it very easy to do page compositions where you are mixing different photos and text like you see above.
You will want to do a page setup sizing of 16″ wide by 9″ tall. This is a special custom size. It is the proper proportions that match the screen ratio of our monitors. If were to just do a layout on a 8-1/2×11 paper sheet, it wouldn’t match the proportions of your screen. Since we are making desktop wallpaper, we want an exact ratio match.
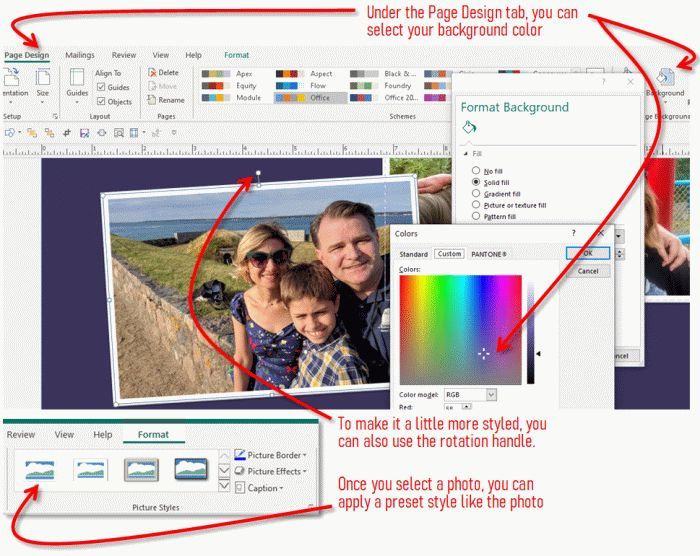
You can find both the size setting and the background color setting under the Page Design tab. For the background color, I prefer the darker colors so that it doesn’t strain your eyes when looking at it for any length of time.
After your page is ready, you can simply drag and drop whatever photo JPGs you want to use. Once they are on the workspace, you can size them by dragging in/out on any of the four corners and move them into whatever position works for you. To rotate any image, use the handle at the very top of the image once you have selected it. On the format tab, you can also pick from various preset styles. For instance I used the white frame option so it looks like photographs used to look long before we were digital.
The next part of my desktop wallpaper will be the calendar. For this, I like to use timeanddate.com and specifically the page that creates printable pdf files. That link will take you to page. The pdf version of the calendar will create a higher resolution source that you can take better snapshots from. The calendar generator will create an entire year. However, in my case, I like to take snapshots of 4 months at time. Otherwise the calendar would take up a large portion of the desktop space. I want the majority of the desktop to be for photos and the calendar will just be the minor portion.
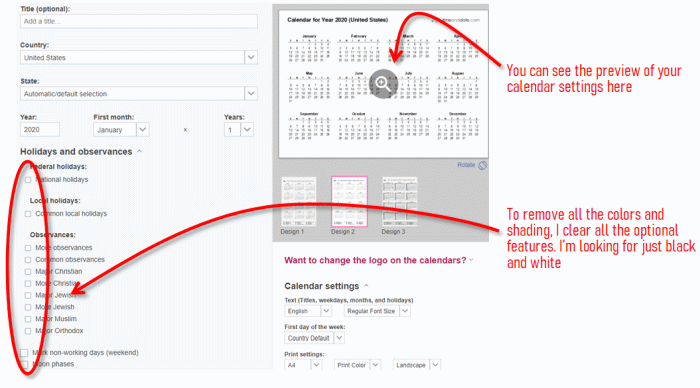
Once we have created and opened up the calendar pdf, the best results will be produced when you zoom the portion that you want to capture to be as large as possible on the screen. If you aren’t familiar with how to capture screenshots, take a look at this post of mine where I give more detailed instructions.
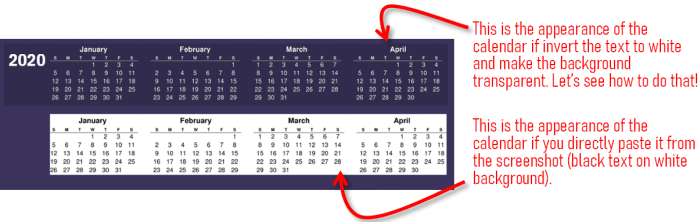
You could paste the snapshot calendar directly onto your composition. In the illustration below, the bottom calendar is how that looks. The calendar has a white background box. This is okay and you could go with that. However, if you want to take it to another level, let’s look how we can invert the calendar color so we get white text. Further by making the background transparent, the main color of our wallpaper shows through.
If you have Photoshop, this of course is a great choice to do the steps noted above. Many people though don’t have Photoshop. So let’s take a look at a great web app that does much of what Photoshop does (and it is free!) The site is photopea.com
When you take your calendar snapshot, save it to a file. Once you have the photopea window started then you can open the calendar file that you created. Use the magic wand tool with the contiguous setting OFF and click on the background area. This will create a selection of all your white background. (The contiguous off setting will allow the selection to get the areas also even inside the letters and numbers). Once you have the selection, press the Delete key. You’ll see the background area turn to a checkerboard pattern. This indicates that it is now transparent. Use the Ctrl+D (Command+D) shortcut to clear the selection.
We still have black text, so the next thing to do will be to invert the image. You can do this through the image menu > adjustment > invert (or just use the shortcut Ctrl+I/Command+I). That’s it, use the export command to save a PNG file that you can insert into your desktop wallpaper composition.
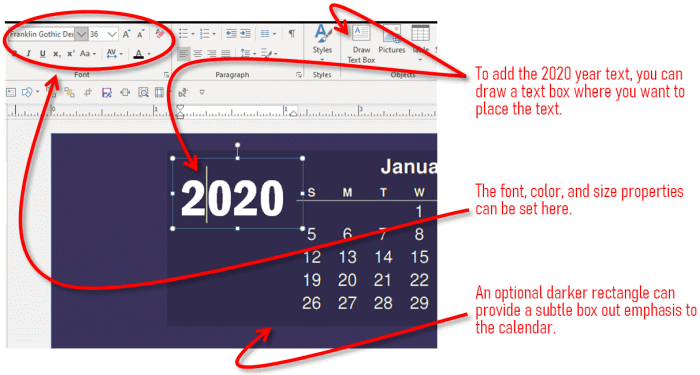
Drag and drop your white on transparent version of your calendar into the Publisher app. Then move it and size it how you like it. To give my calendar a little emphasis, I added a slightly darker color background rectangle that you can see in the above illustration. You’ll need to use the “send to back” tool in cases like this (otherwise the new rectangle would appear on top and blocking the view of the calendar)
The Text Box tool will allow you to place text on the canvas. Let’s use that tool in order to put the 2020 year label. You’ll want that to be white text. You can also set the size and the font to your taste.
Finally, you’ll want to remember to save your file occasionally as you go through these steps so that your work is safe. Further, by saving the publisher file for future reference, you can update it with the next calendar or photo choices in the future.
The last step is to export as JPG so that you can actually set it as your desktop. In publisher, you can do the “Save As” command and choose the file type to JPG. I like to save these types of files in the Pictures subfolder of your user folder. Once you have saved the file, find the file in the file explorer, and right click on it and choose “Set as Desktop Background”
Now if the above sounds interesting to you and you are ready to try it out, you may want to watch the how-to video below to see the various steps shown for you to learn and follow along.
Recommendation: once starting the video, click the full screen button in the lower right corner to see the details better of the tutorial.