Very high on my list of necessary tech tools is the screenshot tool. Whether you are on a Mac or on a PC, both systems have a built in means to capture a portion of your screen as an image. You can use the screen capture to share an idea with someone else or save it for your own future reference.
First, let’s look at the shortcuts you’ll need to know to create screenshots and then we’ll explore some ideas how you can use your captured images.
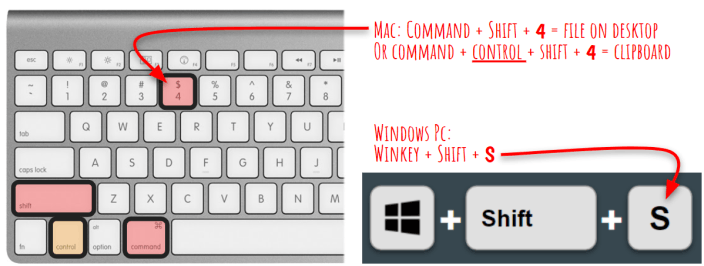
Command + Shift + 4 on a Mac will let you drag a boxed area that you want to capture. It will put the result image on your desktop. If you want it on the clipboard (i.e. ready to paste somewhere) add the Control key in the mix. PS – sorry mac users, I didn’t design a four-key shortcut! I’m just the messenger 🙂
Windows PC, you’ll want to memorize WindowsKey + Shift + S. Your screen will darken and you can drag a boxed area for what you want to capture and it is place on the clipboard ready for you to paste somewhere. (Note: the “clipboard” is not something you see. Think of it as an invisible place where your computer holds onto something for you until you are ready to paste it somewhere.)
Let’s Illustrate a Capture and Paste
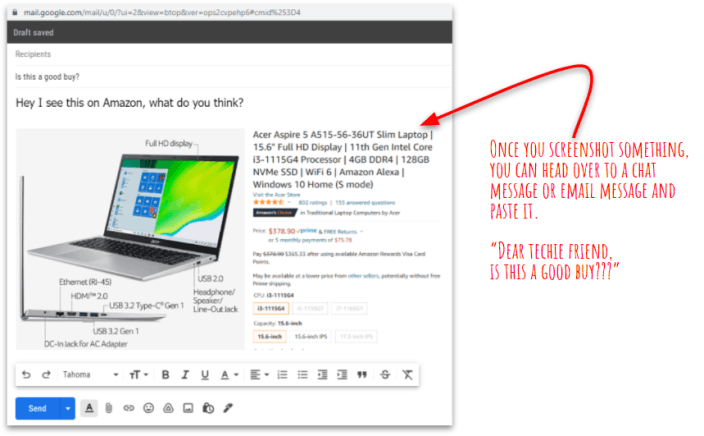
What if you were shopping on Amazon for a new laptop and you want to get the opinion of your very techie friend on if it is a good choice. By doing a screenshot, you can capture not only the photo, but the description and price all together. Next, you head over to an email message or your chat window and PASTE. (Ctrl+V on PC/Command+V on Mac – those are also great shortcuts to know!)
Adding Some Markups to Your Screenshot
Well, your techie friend reviews the specs on what you’ve selected and sees some good and some bad. So he does another screenshot of the specs list. On a *Windows PC immediately after the screenshot, in the bottom right corner of the screen, a notification that pops up. When you click on the notification, it opens the screenshot in the Snipping Tool app (aka “Snip & Sketch” in Windows 10). In this app, there are different markup tools like pen and eraser, and highlighter. You also can turn on the ruler if you want very straight markup lines.
*(Note: if you don’t get a notification popup, you may have notifications turned off. Go into Windows settings and search for “notifications“. Make sure that you have the allow app notifications turned ON. Also, check that your focus assist setting is not set to temporarily block notifications.)
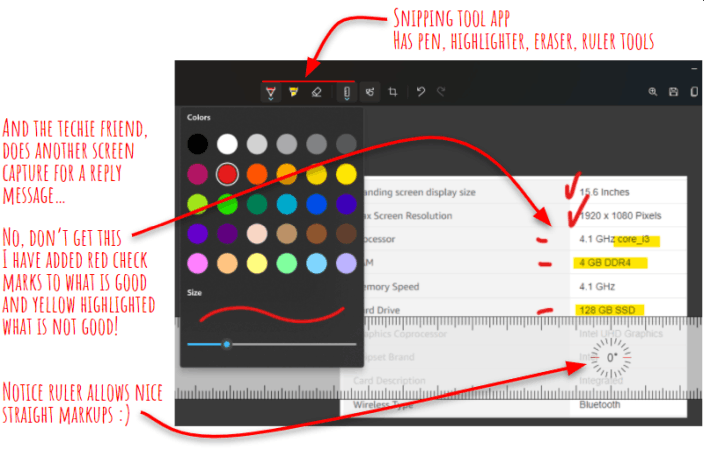
So your techie friend puts some red pen check marks on the good parts, but highlights in yellow the bad elements (don’t get 4GB RAM and a 128 GB SSD, you’ll be sorry on both counts). In snipping tool, after each markup tool you use, your clipboard is automatically updated, so all you have to do is go back to your reply message and Paste again and help your friend out.
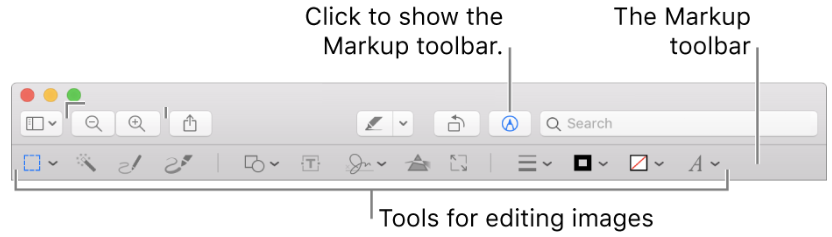
Note: if you are on a Mac and want to do markups, right click on the screenshot file and choose “open with Preview”. Once the app is opened, see the illustration below. Once you show the markup toolbar then you can draw on the snapshot and add text as needed. This short video is very helpful to see how these tools could be used. This link to the apple support website also discusses the various tools in more detail.
Saving a Screenshot to a File
If you are on a Mac, you can use the shortcut that saves the screenshot directly to a file. But if you are on a Windows PC you can also save to a file. Consider if you want to use the screenshot in a blog post, you’ll need an image file that you can upload because you won’t be able to paste the snapshot directly into a blog post. You have to upload an image file to the web server. So in this case, if you are in Windows Snipping Tool, just use the Save button on the toolbar and save your screenshot to a file.
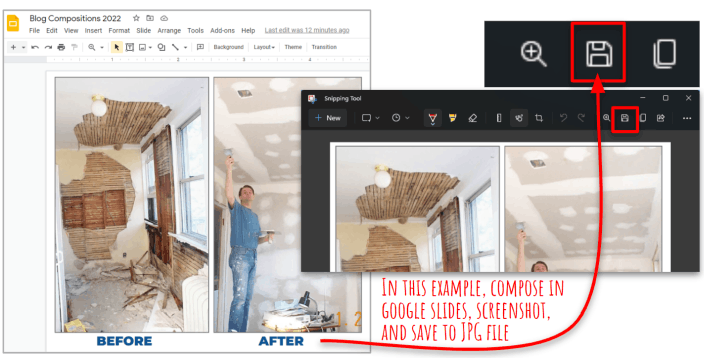
Sometimes in blog posts you want to have more than just a photo. A composition is where you can put several photos together along with caption text. You can arrange these objects in various ways to get the composition that you want. Before and after compositions are just one example of having side by side comparisons of some dramatic change.

I use Google Slides for making my compositions. After I do the composition, I use the screenshot technique to capture it to a file that I can use in my post. Google Slides is a free and amazing Google app that I recently demonstrated in my ActiveRain Zoom presentation. I’ll be posting more on my blog here about how to use this tool, so make sure and click the follow button for my blog if you haven’t already 😉
I have created a short how-to video that you can watch below. It talks about creating screenshots on a Windows PC and how to add markups also.
Video Tip: after starting the video press the F key to view in full screen