Sometimes it’s just easier to SHOW rather than to TELL.
Let me illustrate one show vs. tell example…
When is the last time you checked to see if your social badge links were up to date? In ActiveRain, would you know how to fix this? Notice in the snapshot below, you start on your profile page and then click “Edit Profile.” From there, notice the pencil buttons scattered about the page. These are all edit points where you can go in and modify. For your social icon badges, you can choose which ones to show and make sure they are updated by clicking that particular pencil.

Now, let me ask you. Did you understand what I said above more from the text description or from the screenshot where I marked it up with red lines and yellow highlighter? (I’m going to guess the latter.)
Today’s lesson is not about changing your social icons but rather about how you too can make screenshots like the above (consider it a bonus lesson about checking your social sites, you’re welcome!)
In my my 2019 Technology survey, I could see what those who read my posts use for their types of main computers. I’m seeing that many now use Windows 10 (I’m pleased to see most are using the current version of windows) and others use Macs. In this lesson, I’ll share how to do screenshots on both types of systems.
If you are using Windows, we have had a little gem of a utility app for many years and I always enjoyed hearing people say how useful it was when I introduced them to it. It was called the “Snipping Tool“. However, as my survey shows, most have now moved on to the latest Windows (version 10) and the snipping tool has graduated to a new tool called Snip & Sketch. So if you used Snipping Tool but haven’t switched to the newer option, it’s time!
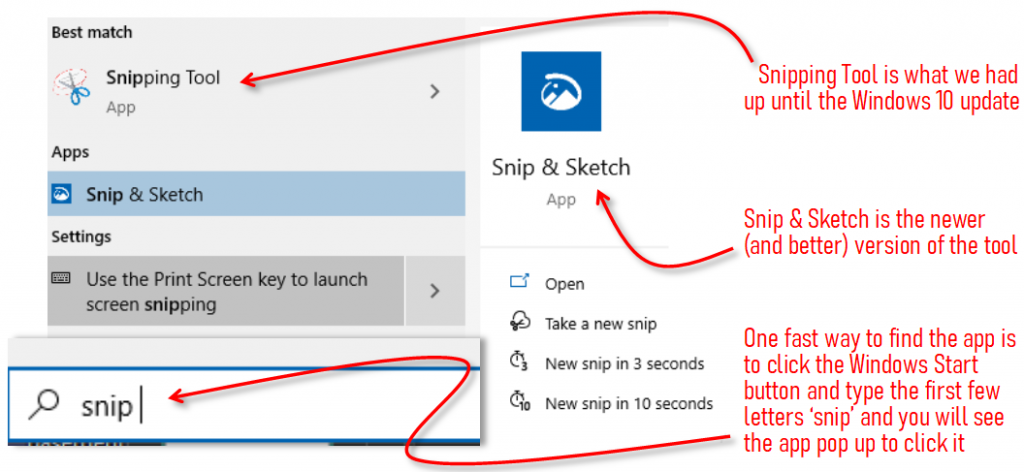

If you want to find this app, click on the Windows Start Button and type a few letters and the app will appear so you can click on it. However, I highly recommend that you learn the shortcut for this command, WindowsKey + Shift + S — PS, the WindowsKey is two keys to the left of the spacebar. Whenever you use the shortcut, the screen will dim and you can then drag a rectangular box selection area that you want to capture.
Once you have done a screenshot capture, your selected area is automatically placed on your clipboard. So for instance, if you were composing an email to somebody, you could just paste it into your message.
However, snapshots are often more valuable when you can mark it up with lines or highlights. If this is what you want, then immediately after you do a snapshot, notice the popup that appears in your notification area (lower right corner of your screen). If you click on that notification when it appears, it will open into the app where you have the ability to add some markup.
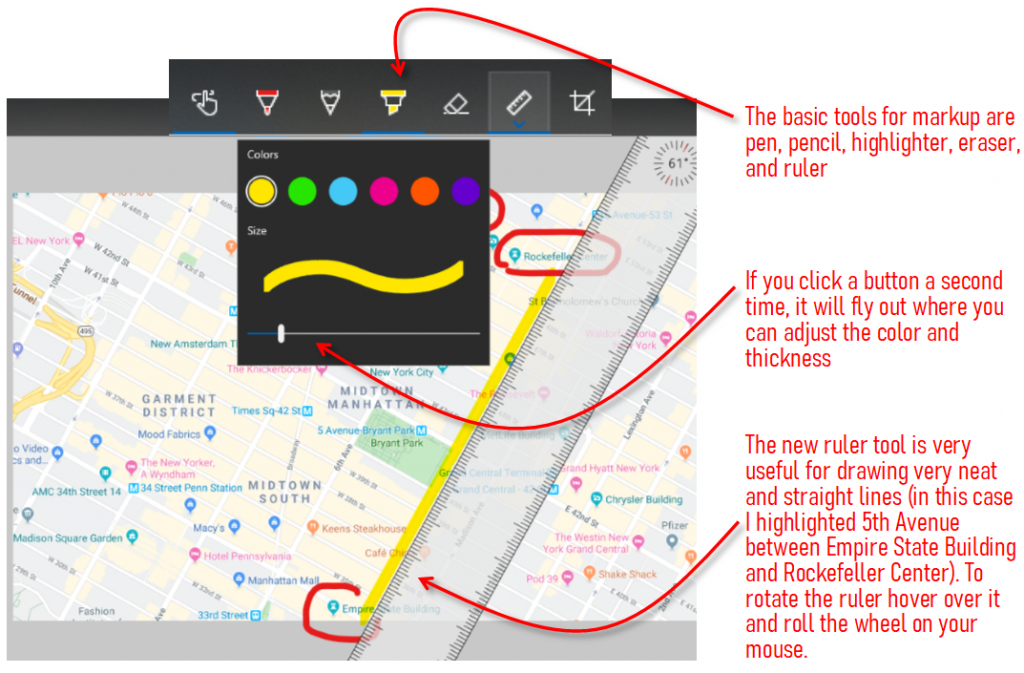
Doing a snapshot of a map and then marking it up is one example of how these tools could be useful. Imagine you are planning a trip to NYC and you want to highlight a possible plan for a day trip. In the example below I circled with red pen the Empire State Building and Rockefeller Center and drew a straight yellow highlight line up 5th Avenue between them. If you click on any tool button a second time, the flyout appears where you can pick the pen color and width. To use the ruler tool, drag it into place and then rotate it by hovering over the tool and rolling the wheel on the mouse.
After you have done markups in the Snip & Sketch app, your clipboard will automatically be updated to contain your marked up image. It will be ready for you to paste. For example you may be composing an email to someone or you may want to put it in your favorite note taking app (BTW, that’s a soon future post). You may also want to save the markup as a PNG or JPG file, to use in a blog post for example. Click on the save button and you’ll be all set.
If you are on a mac computer, here are some notes to help you do snapshots. The shortcut you need to know is Command + Shift + 4. This will allow you to box out an area on your screen to capture and it will write the capture to a file to your desktop. From there, if you want to add markups on the snapshot, right click on the file and choose “open with Preview”. Once the app is opened, see the illustration below. Once you show the markup toolbar then you can draw on the snapshot and add text as needed. This short video is helpful to see how these tools could be used. This link to the apple support website also discusses the various tools in more detail.

I think many of you knew about doing snapshots, but hopefully I shared a few things that help you take snapshots to the next level. And, if you are using Windows 10, be sure and check out the great new features of Snip & Sketch.