Photography is part of modern daily life now. Think about it. You carry a camera (in the shape of a mobile phone) with you at all times in your pocket (or purse). How many photos did you take today? how many this week? this month? this year?
One of my all time favorite tech tools relates to working with photos (if you know me and tech, giving such an accolade should make you be more than a little curious!). That tool is Google Photos.
I’m going to introduce you to this tool and highly recommend to you that you check it out. And if you already know about it, perhaps I’ll share a thing or two that you didn’t yet know.
Google lets you store a copy all of your photos and videos for FREE. So the first perk of using Google photos is having your photos backed up. Phone lost or stolen? Computer hard drive crash with all your photo folders? If you can imagine yourself in those situations and then you think of some of your precious photo moments gone forever… well, do I have your attention now? You’re welcome.
Google photos is MUCH more than just a backup system though. It has a simple, yet amazing set of editing tools to make your photos look better. It also has an online albums feature where you can pick out a set of your favorites and share the album with others. (Have you ever tried to share a bunch of photos as email attachments? You realize then how cumbersome that process is!) Google is the king of search and searching photos gives you amazing power, I’ll show you all of the above. Let’s get started now getting more details so you can start using it!
Backup of Your Photos and Videos
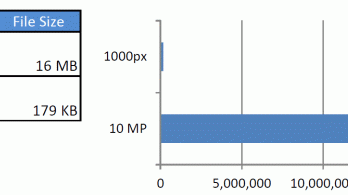
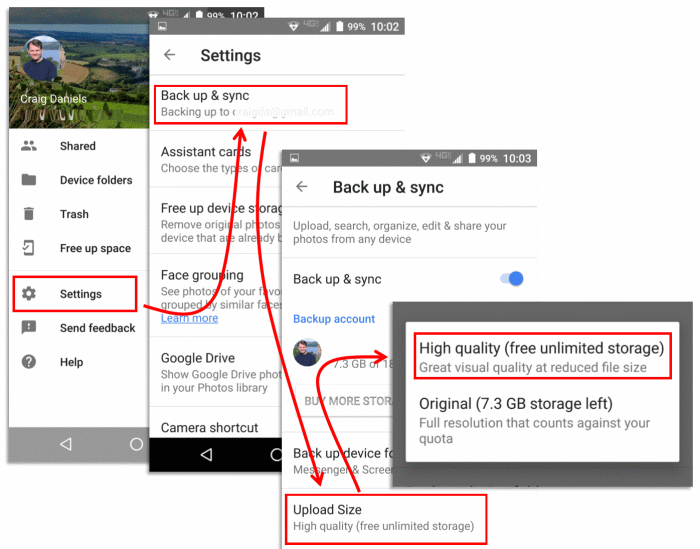
Consider the peace of mind knowing that you have a backup copy of your photos and videos. So when you lose your phone or drop it and then it will no longer boot, all those vacation photos that you just took are still safe online. Once you install the app on your phone (Android or iOS), you need to configure to enable the automatic backups. It will by default only upload a copy of your photos while you are on a wifi connection which is good so that you don’t get charged for data overages on your cellular plan. The other setting that you will want to check is the “upload size” setting. I highly recommend that you leave it set to the high quality setting. This gives you UNLIMITED uploads for FREE. This is a very high 16 megapixel max resolution (or 1080 video resolution). That’s a deal that’s hard to beat! (if you opt for the “original” photo setting it will be tracked against your google storage quota and would have to pay for more storage as you max out. I think only extremely few people would want or really need this option)
Besides just uploading the photos that are currently on your phone, there is also a desktop app (use that link to go to the download page for both Mac and PC) that will let you upload all of your photo folders to the cloud. This will give you online access to your entire photo library. Keep in mind when you first install the desktop backup app, it may need to run in the background for quite some time to get all your files uploaded, but it is worth it!
Photos in the Cloud
One of the instant advantages of having your phone automatically backup to the cloud server is that you can sit down at your computer or your tablet and immediately enjoy your photos in much LARGER size than you can see on your phone.
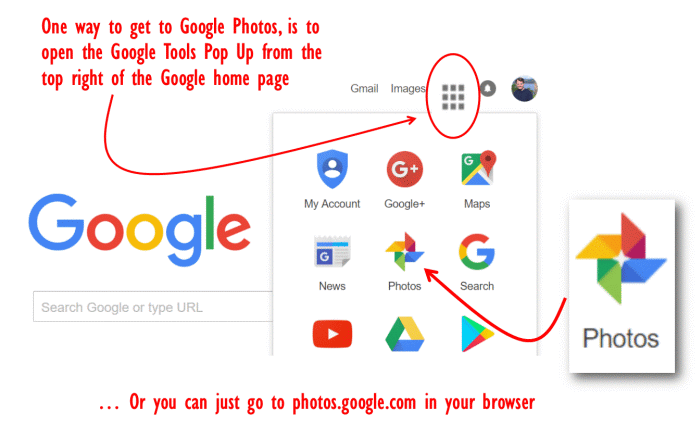
How do you get to google photos on the web?
On the google home page, at the upper right of the screen is a button that shows many different google sites, photos is one of the buttons you can choose. Or, if you wish, you can just go to photos.google.com in your browser.
Simple and Amazing Editing Tools
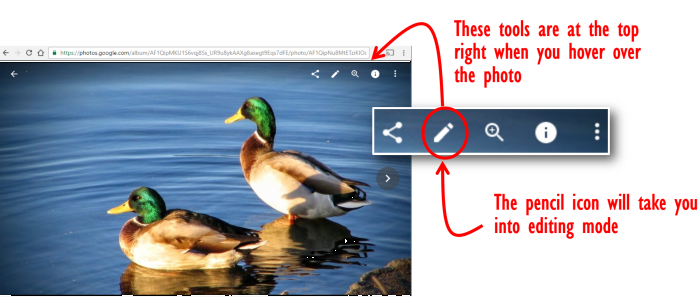
It could be very easy to miss the editing mode but once you discover it, you’ll be hooked. When you are viewing an individual photo, look for the pencil icon at the upper right of the photo. This takes you into editing mode.
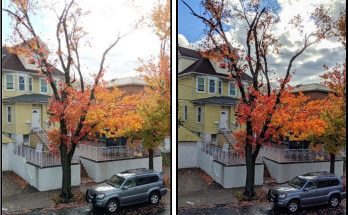
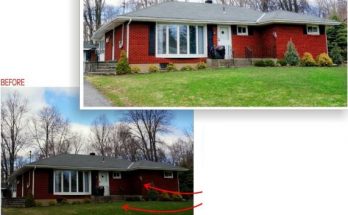
See below for an example below of before and after edits were made. The original version I show in the inset and you can see it is a little dull and dark. The edited one on the right is brighter and more vibrant.
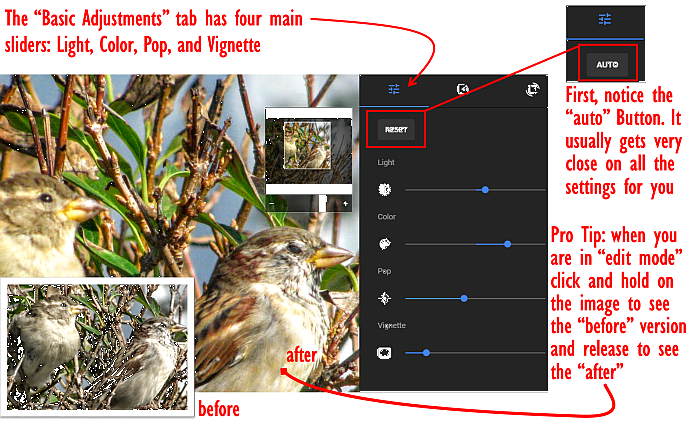
The very first thing I want to point out that you definitely do not want to miss in editing is the “Auto” button. This one click can do some amazing things instantly. It automatically detects the adjustments in the four categories for you. Usually then you can fine tune it a little and you are good to go! The four categories for editing are: Light – so you can add brightness, Color to make your colors stand out with more vibrance, Pop – which adds clarity and sharpness, and Vignette which adds subtle darkness around the edges and is particularly used with portraits of people to draw the eye to the center of the picture.
I’ll give you one more little “pro” tip that I particularly like to do. After you have made some edits, click and hold somewhere near the middle of the photo. This will show you the “before” version of the picture and when you release you get to see the “after” version. You’ll be amazed at the comparison and how much better the after version looks! I say to click somewhere near the middle for this, because if you click on the left or right side of the photos it takes you to the previous or next photos (which by the way is useful to do when you are editing a series).
Finally, to note is this; the edits that you do are called “non-destructive” which means that you can always “reset” to get back to the original version of the photo.
Besides the four basic adjustment type of edits mentioned above, you can also crop and straighten your photos which very often comes in handy. (There is a third toolset for “color filters” similar to what you might get in an app like instagram. I guess there is some “artistic” tweaking that you can do if you are so inclined, but for me personally I don’t have much use for that toolset but it is there if you wish to explore.)

There will be times that you need to take your photos out of the Google world in order to utilize them in different places. For example, adding one of your edited photos in a blog post, sending a set of photos to a printing service, or if you are a real estate agent, you may need to get the edited versions of your photos to upload to your MLS. In a section below, I illustrate how to select multiple photos, you will use that technique to pick the ones that you want to get, and then by clicking the three-dots button at the top of the page, you will want to choose the “download” option. This will give you the high resolution files in their edited state so that you can use them elsewhere.
Google is Synonymous With Search
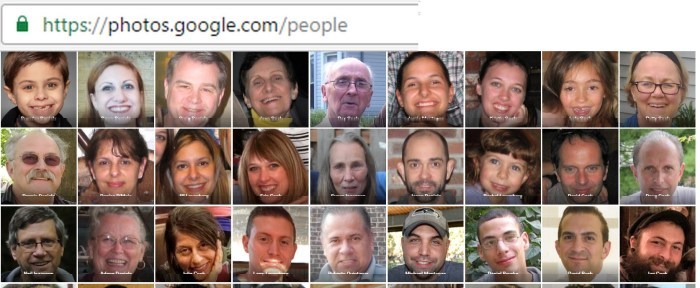
If you want to find something, what do you do? You “GOOGLE” it. Well, googling your photos can be a huge assistance when you are trying to find “that one photo” in thousands. One of the first things that you may want to try searching for is people. Google identifies faces and groups photos together by matches. (PS you can see this people page at photos.google.com/people or you can also get there through the “Albums” home page)
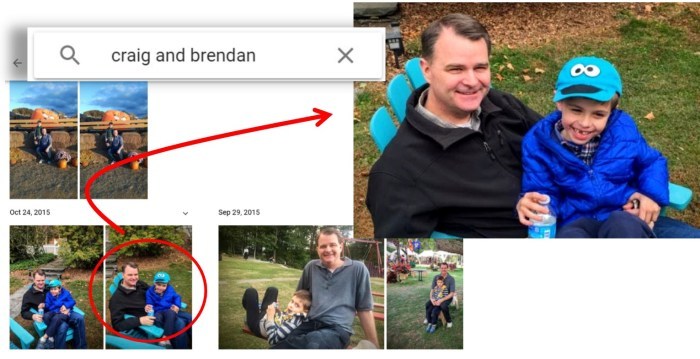
You can click any of the faces to have it show you all photos that it found with a matching face. Further, if you take a few minutes and tell google the names of the people you can then search by name. What is also interesting is that sometimes you want to find photos of certain people together. Take an example of me and my son together. Let me do that search to see what I can find.
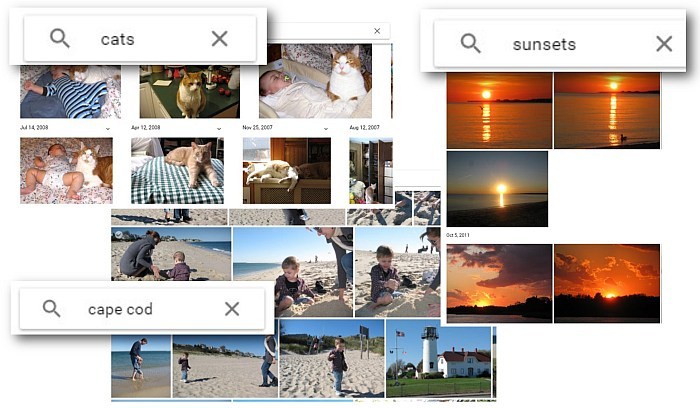
In the next search examples, let’s look in my library for places and things. I’ll search for “cats” and “sunsets” and let’s try a place “cape cod”…
Albums
Though it is possible in Google Photos to share a link to a single photo, usually you will want to go through your photos and select many photos to share. The method to do this is by creating Albums and then sharing a link to all the album. You can get the URL to the album, by clicking the share button that you will find at the top of the album’s page.
When somebody clicks a link to an album page, the first thing you see is a page of thumbnails. You can click any thumbnail to see the larger version. They can use the left/right arrow keys to go through the album (or click the left/right edges of the photo to go forward and back. (Tip; F11 key in a browser goes in and out of full screen view and full screen view is especially nice when viewing photos). Albums additionally have a “slideshow” mode which you can get to by clicking the three-dots button at the top right of any photo page.
Click here to see an example of an album from Craig’s Library

One easy way to start an album is from the thumbnails view of your photos. Select one or more photos by clicking the check mark in the upper left corner of the thumbnail. Next click the plus (+) button on tht top toolbar and choose the “Album” option. You will be given the choice to add the photos to an existing album or to make a new album that you will need to give a name.

One more feature of online albums that is fun to do sometimes is to turn on the “collaborative” option. This means that other people that you invite to the album can also add their own photos. My family has done this recently a few times, for example with a recent wedding. We all could see each other’s best photos of the day and it was very easy to do this.
Assistant
On the top left hand side of the window when you are in the Google Photos environment, there are three main areas to explore. “Photos” shows all your photos sorted by most recent. “Albums” which shows all the albums that you have created. The top most one is called “Assistant.” This is Google being a little bit creative with the photos that you’ve taken and it notifies you once in a while that it has something new for you to check out to see if you like it. It is kind of fun and often surprises you with some good stuff.
One of my favorite items on the Assistant page is called “Rediscover This Day“. It creates a collage of a few photos from the same day one or more years back and notifies you that you to come check it out. It is often fun to see that collage and then jump back to the rest of the photos from that memory.
There are several types of items that Assistant will create for you. It can create animated GIFs if you take several shots in a quick sequence. It can stitch a few photos together for a panorama if you taken the shots in a panning motion. It sometimes alerts you that it has created a 1 minute highlight video of a day and it puts it to a background track of music. It also creates “stylized photos” and collages.
Google Photos – Check It Out!
Well that’s enough of me giving you the tour. Time for you to go check it out! Remember all the things that you can do: backup, easy viewing on multiple devices, simple and powerful photo touchup, simple sharing of your photos, searching and finding otherwise lost memories and new discoveries all the time! I give this tool my highest rating and recommendation. i hope that you enjoy it too!